Welcome to yet another coding section of ‘pro coding’.
On this article,we are showing you ‘how you can create a ‘Navigation Bar’ using ‘HTML & CSS’
I think you all guys are aware about a navigation bar on a website.
When we are getting one to our website,you can notice some categories at the main top (header) which contains options like ‘DISCLAIMER,PRIVACY & POLICY’ and so more.

So here, we are making a navigation bar using HTML & CSS,.
So follow my steps carefully to complete the tutorial.
Now, I will explain the whole code and describe it step by step :-)
The following is for making the navigation bar in row format.
ul { list-style-type: none; margin: 0; padding: 0; overflow: hidden; background-color: #333;}li { float: left;}li a { display: block; color: white; text-align: center; padding: 14px 16px; text-decoration: none;}li a:hover:not(.active) { background-color: #111;}.active { background-color: #4CAF50;}
** * Home**
** * News**
** * Contact**
** * About**
After the HTML files, you might notice a tag ‘Ul’ before opening the the open brace.
Well, this ‘ul’ tag denotes the un-odered list.
For example,
- unordered list
- disposed
- bin mailbox
- menu list
This code contains ‘ul’ tag will make the following result
*unordered list
*Disposed
*Bin mailbox
*Menu list
So these functions are made using this ul tag.
I hope you understood why I put ‘ul’ tag above.
The ’li’ tag is mainly using for line breaks.
The second property is ’ list-style-type: none;’
Well,we can say this is a useful property to avoid unwanted letters with a dark dot.
If you remove this line. You could see a black dot in the option ‘home’
So for avoiding this ,we use ’list-style-type’ as none.
The margin and padding is 0;
Because,we are planning the navigation bar at the top.
So set the margin=0 and padding=0;
When coming to the next section,you are able to see
‘Float’. Well,this float decides the position of our elements. If it is a text,image,video or whatever it is. If you set float=“left”; or right. The position changes.
*Display:block;
This tag has the ability to give shape to our navbar rows.
This will make the options as a section of blocks very clean. For putting our stuffs in a block,we are using ‘block’.
* text-decoration: none;
To avoid underline on the letters we type ,we must use ’text-decoration’.
Probably, its a must line to learn. In this case ,if you type a name without declaring
text-decoration: none;
The letter you enter will be shown as underlined.
Now, we can move to next line.
View the below code.
active {
background-color: #4CAF50;
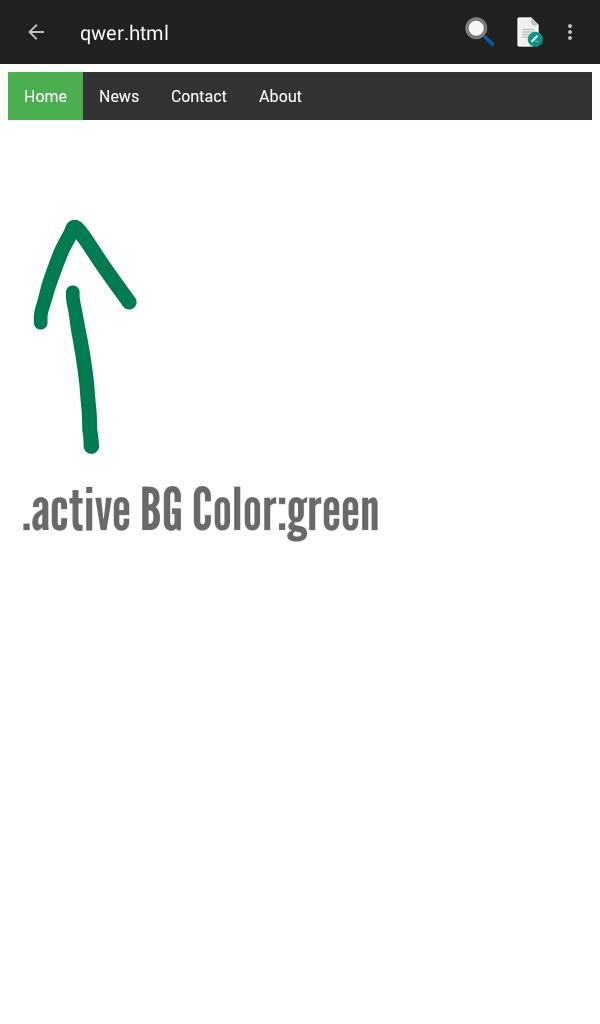
Here we are making a navigation bar contains some options like ‘home,News,contact..,’
So if you wanna make a button or a function (home, contact..) as active. It will the active and default option. In case ^ here, ‘Home’ is our active function.
For making that function active,we normally declare
Active {
The colour code #4CAF50 represents ‘GREEN’ color.
You could also declare the color in alphabet instead of color code by removing the # tag before declaration. In normal , color code is used as well.

Now we have successfully declared the properties of the functions. And now we can declare the needed tags to apply this function to it.
So,close the tags you opened. Now it’s the time to give preferd link to the functions.
href="#"
In place of the # symbol, you can give your link. And that’s all. Give links as you like and finally close everything.
Atlast, save the code in .html format and open it with a browser.
And there you will notice a beautiful navigating bar at the top. You definitely gonna love this.
If you have any questions regarding this, you can comment below.