I spent some quality time researching about OAuth in Django. Tried more than 3 packages. Well, it was not just about just installing something and expect everything to work. There was some tinkering which i think i did well. Therefore, this some part of this blog might also help in your case i guess. I will be also uploading a YouTube video of the same, if i do, you can find the video at the bottom of this page.
As I always do, whenever there is a fresh subject to work with, understanding what it is, why does it exist is important. This is also help us to understand about why some steps/process exist when we do it. Therefore, we’ll start from the very start. Please care to read all the ref links I’ve added.
Introduction to OAuth
OAuth 2.0, which stands for “Open Authorization”, is a standard designed to allow a website or application to access resources hosted by other web apps on behalf of a user. Read more OAuth is there to ease the login process into my application and not let people or application itself handle the auth part.
Framework and packages
Most web frameworks have official or community packages for OAuth support. Here, I use Django web framework. While there are good amount of packages for Django, picking the right one not straight unless you try yourself and see how it fits. I’ve went through most of the good packages which are actively being developed. Let us cut short and go straight to the 2 packages in my list.
-
Django-all Auth Integrated set of Django applications addressing authentication, registration, account management as well as 3rd party (social) account authentication. It’s a well developed package out there, but it doesn’t directly offer a full-fledged REST API for user data access or manipulation.
-
Dj-Rest-Auth Drop-in API endpoints for handling authentication securely in Django Rest Framework. Under the hood,it’s built upon django-allauth and DRF. It extends django-allauth functionalities by offering dedicated REST API endpoints for user management.
What do we choose?
Choose django-allauth if:
- You only need basic user authentication and registration (email/password logins) in your Django project.
- You don’t plan to expose a REST API for user data access or manipulation.
- You want additional features like social logins (Facebook, Google, etc.)..
Choose dj-rest-auth if:
- You need dedicated REST API endpoints for user registration, login, and data management.
- Your project involves a front-end application communicating with a Django backend API for user actions.
- You want flexible control over user data access through JSON/XML responses.
- You need features like token-based authentication through APIs.
- You’re already using django-allauth and want to extend its functionalities for API-based user management.
In my case, I’ve a Django app (backend) and a React frontend. Users can login to React app, basically Django is the API which manages everything. allauth is not for me since it’s mostly server-side rendering for user authentication and registration. I want everything over DRF which is more flexible.
I use AWS Cognito service for user management. This is not necessary and you do not need it even if you plan to use OAuth. You’ll see why I use it and you may not have to.
Before we continue, just understand the types of OAuth 2.0 grants.
- Authorization code grant
You’ll receive a
codeafter successful authentication with chosen provider.http://localhost:8000/api/?code=e3d75928-efff-4231-af14-9a74e6b9fa17&state=MlG9gMyakT-uyV0h1EFrYQSince this is the one I’m using and prolly you should be also using, I’m not going to discuss about other types. You can read more here.
Above URL will be more clear as we go, just see that we get a code in the URL and which is what we use to get our access, refresh tokens. This access token is our token to authenticate to our backend. We’ll talk about refresh token later. For now, this is it.
Create an OAuth app
This could be in Google, GitHub or anywhere else. I use Cognito, again it does not matter. But’ll show how it is in GitHub as well.
GitHub OAuth app creation is explained here. Just follow that as it is. One note about Authorization callback URL which in our case would be http://localhost:8000/dj-rest-auth/github/. You’ll see why when we continue with this.
If you’re on AWS Cognito, create a User Pool while considering below points, if you’re testing your setup while skipping non-important parts.
- Skip adding Federated identity providers
- Check Phone number, email for Cognito user pool sign-in options
- No MFA
- Uncheck Self-service account recovery
- Uncheck Self-registration
- Uncheck Cognito-assisted verification and confirmation
- Select email in Required attributes
- Select Send mail with Cognito than setting up your own mail for now.
- Enable Use the Cognito Hosted UI
- Use a Cognito domain
- Public client
- Don’t generate a client secret
- In Allowed callback URLs, give
http://localhost:8000/dj-rest-auth/cognito/, Again the specifics about “why this URL”, we’ll see later. But, just know that the callback URL we give here will be the URL that we’ll get redirected to when we successfully sign in. This could be our app itself. The endpoint/URL path really does not matter at all.
Read more about User Pool. We’ve already talked about OAuth 2.0 grant types just before. Again, we’ll use only Authorization code grant. The Connect scopes option will be visible under App integrations. Choose email and profile for sure. Wait! this is not an AWS tutorial. We’ll skip this for now.
Setup a simple Django app for testing
My setup is as:
- Projectname:
myapp - Appname:
pollsNow, we’ll be only looking at 2 docs from now. Django-allauth docs and dj-rest-auth docs. - https://docs.allauth.org/en/latest/introduction/index.html
- https://dj-rest-auth.readthedocs.io/en/latest/index.html Read a bit above, install and setup those including cors headers. At the end, your settings would look similar to mine?
# Django settings for myapp project.
from datetime import timedelta
from pathlib import Path

# Build paths inside the project like this: BASE_DIR / 'subdir'.
BASE_DIR = Path(__file__).resolve().parent.parent

# SECURITY WARNING: keep the secret key used in production secret!
SECRET_KEY =  "django-insecure-=+8s5y-!)x3a*jdxxxxxxxxxxu)cd!d^4-hfyy-_"

# SECURITY WARNING: don't run with debug turned on in production!
DEBUG =  True

ALLOWED_HOSTS = []

# Application definition

INSTALLED_APPS = [
"django.contrib.admin",
"django.contrib.auth",
"django.contrib.contenttypes",
"django.contrib.sessions",
"django.contrib.messages",
"django.contrib.staticfiles",
"rest_framework",
"rest_framework.authtoken",
"dj_rest_auth",
"allauth",
"allauth.account",
"allauth.socialaccount",
"allauth.socialaccount.providers.github",
"allauth.socialaccount.providers.amazon_cognito",
"dj_rest_auth.registration",
"corsheaders",
"polls",
]


MIDDLEWARE = [
"corsheaders.middleware.CorsMiddleware",
"django.middleware.security.SecurityMiddleware",
"django.contrib.sessions.middleware.SessionMiddleware",
"django.middleware.common.CommonMiddleware",
"django.middleware.csrf.CsrfViewMiddleware",
"django.contrib.auth.middleware.AuthenticationMiddleware",
"django.contrib.messages.middleware.MessageMiddleware",
"django.middleware.clickjacking.XFrameOptionsMiddleware",
"allauth.account.middleware.AccountMiddleware", #Allauth middleware here
]


ROOT_URLCONF =  "myapp.urls"
# Default TEMPLATES here
WSGI_APPLICATION =  "myapp.wsgi.application"

DATABASES = {
	"default": {
	"ENGINE": "django.db.backends.sqlite3",
	"NAME": BASE_DIR /  "db.sqlite3",
	}
}


# Defaut AUTH_PASSWORD_VALIDATORS here
# I'm not using AUTHENTICATION_BACKENDS settings


REST_FRAMEWORK = {

	"DEFAULT_AUTHENTICATION_CLASSES": (
		# "rest_framework.authentication.SessionAuthentication",
		"rest_framework.authentication.TokenAuthentication",
		"dj_rest_auth.jwt_auth.JWTCookieAuthentication",
		),
	"DEFAULT_SCHEMA_CLASS": "rest_framework.schemas.coreapi.AutoSchema",
	}


SIMPLE_JWT = {
	"ACCESS_TOKEN_LIFETIME": timedelta(minutes=15),
	"REFRESH_TOKEN_LIFETIME": timedelta(minutes=20),
}

REST_AUTH = {
	"USE_JWT": True,
	"JWT_AUTH_COOKIE": "my-app-auth",
	"JWT_AUTH_REFRESH_COOKIE": "my-refresh-token",
	}

LANGUAGE_CODE =  "en-us"
TIME_ZONE =  "UTC"
USE_I18N =  True
USE_TZ =  True

CORS_ORIGIN_ALLOW_ALL =  True

STATIC_URL =  "static/"

DEFAULT_AUTO_FIELD =  "django.db.models.BigAutoField"

SOCIALACCOUNT_PROVIDERS = {
"amazon_cognito": {
	"DOMAIN": "https://<DOMAIN>.auth.<REGION>.amazoncognito.com",
	# "provider_class": "polls.views.CustomAmazonCognitoProvider",
	},
}

AUTH_USER_MODEL =  "polls.User"
ACCOUNT_EMAIL_VERIFICATION =  "none"
We’ll just look at above settings again.
Since. here we only use amazon_cognito and github, those and allauth related apps are added in the INSTALLED_APPS. If you had noticed, I did not enabled Django sites even tho they recommend to enable it. Tbh, I do not see how it’s going to help here. I’ve worked with Django sites and when I see here, i don’t think it’s really necessary?. So,I just went without it, and never seen any issues whatsoever. I mean, I do not use something just because we saw somewhere. But, i will use it when it hits me hard, understand why its there.
Django sites, if you add above, for each Social Application you add, you can tie it to a Site. I’ll recommend you watching below video about Django Sites. Its good and to the point.
Now that you know what it is, enable it, see it yourself and use it if you want. Ignore provider_class settings (which is already commented) for now.
A bit[ter] of Django’s token auth
Out of the box, dj-rest-auth uses Django’s default token auth. To put it in simple terms, if you create a user (basil), basil can have a token.
>> ./manage.py drf_create_token basil

{ 'token' : '9944b09199c62bcf9418ad846dd0e4bbdfc6ee4b' }
This token identifies basil. This means, this token provides access to whatever APIs basil can access. Yes, if this gets to somebody’s hand, that’s permanent access. It’s the access token itself. This is why it’s not recommended to use this token auth. I mean, djangorestframework-simplejwt exist to fix this very weakness.
But hey, if you’re have a micro-service which needs to talk with your API and not going to be used anywhere else (put it and forget about it), then they feel free to use this token auth, It makes life very simple. I use it in my micro-services to talk with my Django API. The fact that its not used everywhere and isolated makes it safer.
These settings are added in REST_FRAMEWORK. I’m not using Session auth. You can enable simplejwt by adding REST_AUTH settings as seen above. What you see inside SIMPLE_JWT is from SimpleJWT settings.
Other misc settings
SOCIALACCOUNT_PROVIDERS is added since i use Cognito. If you notice, i’ve not added GitHub settings in Settings. It can be added in Social Applications from Django admin. Since I’ve to add a provider_class for Cognito, i’ve defined it here. In your case, you don’t want to care about provider_class. ACCOUNT_EMAIL_VERIFICATION is set to none , else we need to setup SMTP for sending emails. More about allauth configs here. AUTH_USER_MODEL is my custom user model. You don’t need it.
About the code itself
├── db.sqlite3
├── manage.py
├── myapp
│   ├── asgi.py
│   ├── __init__.py
│   ├── models.py
│   ├── settings.py
│   ├── urls.py
│   ├── views.py
│   └── wsgi.py
└── polls
    ├── admin.py
    ├── apps.py
    ├── __init__.py
    ├── middleware.py
    ├── migrations
    ├── models.py
    ├── tests.py
    └── views.py
In myapp/views.py I’ve added my classes as suggested in dj-rest-auth wiki.
from allauth.socialaccount.providers.github.views import GitHubOAuth2Adapter
from allauth.socialaccount.providers.amazon_cognito.views import (AmazonCognitoOAuth2Adapter)
from allauth.socialaccount.providers.oauth2.client import OAuth2Client
from dj_rest_auth.registration.views import SocialLoginView

class  GitHubLogin(SocialLoginView):
	adapter_class = GitHubOAuth2Adapter
	callback_url =  "http://localhost:8000/dj-rest-auth/github/"
	client_class = OAuth2Client

class  CognitoLogin(SocialLoginView):
	adapter_class = AmazonCognitoOAuth2Adapter
	callback_url =  "http://localhost:8000/dj-rest-auth/cognito/"
	client_class = OAuth2Client
I hope you’ve done setting up myapp/urls.py in your case. Here’s mine;
urlpatterns = [
	path("admin/", admin.site.urls),
	path("dj-rest-auth/", include("dj_rest_auth.urls")),
	path("accounts/", include("allauth.urls")),
	path("dj-rest-auth/github/", GitHubLogin.as_view(), name="github_login"),
	path("dj-rest-auth/cognito/", CognitoLogin.as_view(), name="cognito_login"),
]
Setting up Social Application
Create a superuser and login to admin dashboard, and Add Social Application.
- In
Provideryou’ll see whatever added inINSTALLED_APPS. I can see GitHub and AWS Cognito. Provider ID:githubandamazon_cognitoin my case. Find your provider’s id here. For eg: provider Id of Firefox Accounts isfxa.Name: Any nameClient id:Your OAuth app client idSecret key:Your OAuth app client secret LeavekeyandSettingsempty, its okay for now. I now presume that you’ve added your providers like this. In this case, I’ve added Cognito and GitHub.
Provider OAuth endpoints
Read about your provider’s OAuth endpoints. For GitHub, its explained here. At the end, its about requesting to this URI for the auth code. It goes like;
https://github.com/login/oauth/authorize?client_id=<YOUR_CLIENT_ID>&redirect_uri=http://localhost:8000/dj-rest-auth/github/&scope=user&state=MlG9gMyakT-uyV0h1EFrYQ
And for AWS Cognito;
https://<DOMAIN>.auth.<REGION>.amazoncognito.com/oauth2/authorize?response_type=code&client_id=<YOUR_CLIENT_ID>&redirect_uri=http://localhost:8000/dj-rest-auth/cognito/&scope=openid%20profile%20email&state=MlG9gMyakT-uyV0h1EFrYQ
YOUR_CLIENT_ID: Client IDredirect_uri: Where to redirect to after successful authscope: Read about scopes. Other providers are listed here.
Note, state here is to prevent CSRF. In our case, use above random secret string. Here’s a bonus!
import secrets
def generate_state_param():
    # Generate a random 16-byte string and encode it in base64
    state_param = secrets.token_urlsafe(16)
    return state_param
Upon requesting to above URI, upon successful authentication, you’ll be redirected to the endpoint callback_url in the Class and the redirect_uri. Both should be the same. The redirect_uri is the same you have given in your OAuth app settings.
GET /dj-rest-auth/cognito/?code=5d9f7b59-3303-48b8-b98f-2f941650c35e&state=MlG9gMyakT-uyV0h1EFrYQ
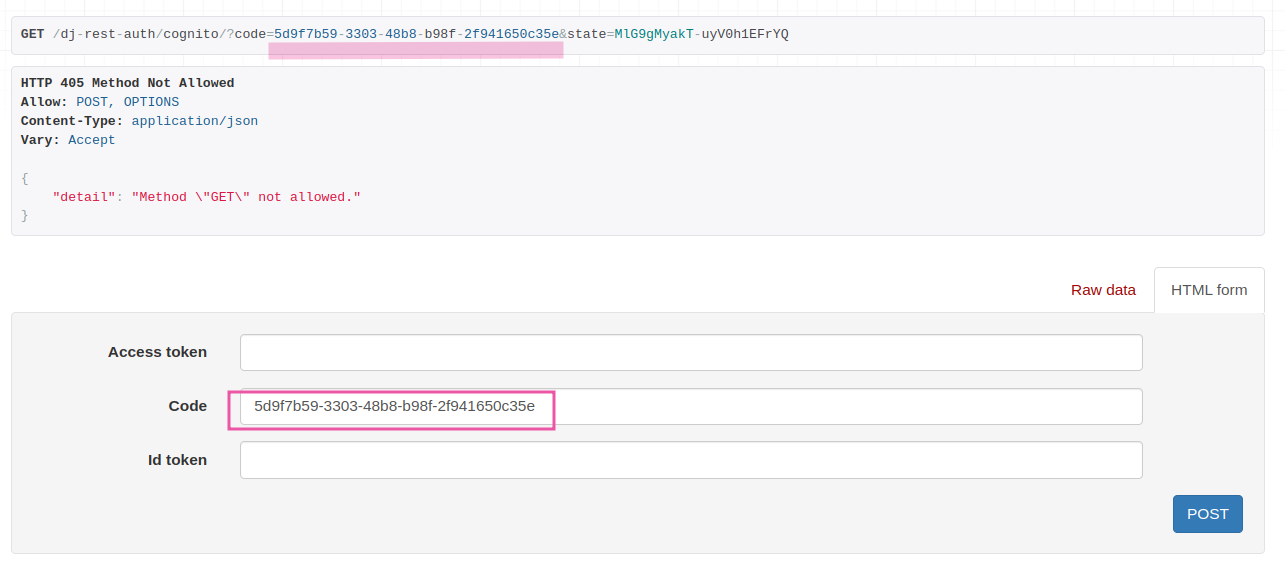
Note that in the URL,we see the code param since authentication is successful. This also means your OAuth app setup is okay. Now, POST the code in the code section.
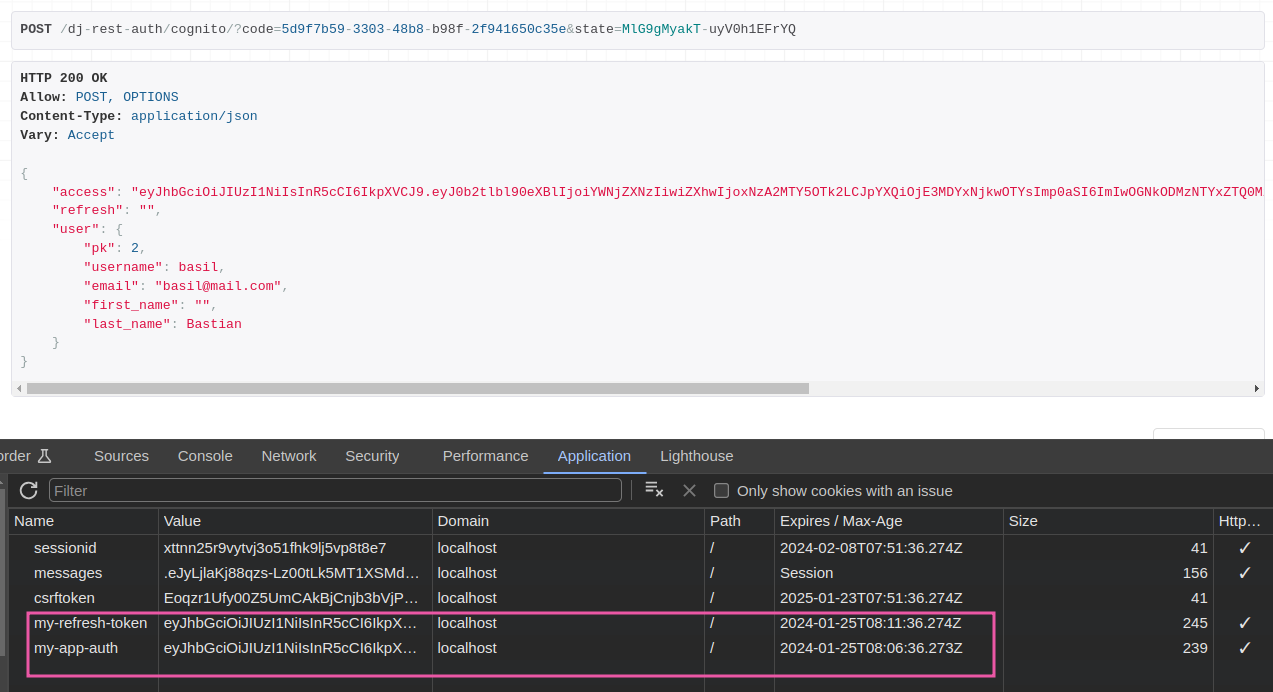
We can also see the JWT related names as we set in REST_AUTH. The token will get disappear in whatever time you give in ACCESS_TOKEN_LIFETIME.
There is a token refresh endpoint http://localhost:8000/dj-rest-auth/token/refresh/. Here, POST your my-app-auth i.e access token.
Also note that, it won’t display refresh token in the browser, see dev tab, applications (saw in screenshot). Also, do your settings like blacklisting token after rounding, etc as given in SimpleJWT wiki i mentioned.
[Bonus] If you need extra_data from Provider
When you authenticate with your provider, it returns you some standard attributes of that user. This are things like; your name, email, nickname and so on. Depending on your provider, you can see their specific wiki. You can see AWS Cognito’s user attributes. Google has their own user claims. More about GitHub scopes.
For example, you might have a custom attribute that indicates whether a user is a paying customer or not. Read more here. See how these are collected in allauth in extract_extra_data() method.
Okay! So, this is indeed a userful thing. I had a requirement where i wanted custom attributes of a user from Cognito. This is useful if you need such custom user scopes/attributes/claims of a user.
When a user is authenticated with their social account, you can find their social account scopes/claims/attributes in Social Accounts table under extra_data. But, like me if you need custom attributes inside extra_data - I’ve asked this question already and got the answer. Read it here. Now, you might have understood why I’ve commented out provider_class in SOCIALACCOUNT_PROVIDERS. I mean, use it if you really want it. Most of us are already happy with existing infos.
How to login/logout from a frontend app
When you’re building a frontend app which talks to your backend, you must take care of few things.
- User wants to login
- Pass this login creds to Cognito to get auth Code
- POST this auth code to
dj-rest-auth/cognito/end-point as we discussed - Reponse header will have a Set-Cookie which will automatically set cookie to your browser.
If you think about logout, allauth already has dj-rest-auth/logout endpoint which accepts POST request. This will invalidate the token/cookie in the backend. To remove the same from browser/frontend, you would need to call it withCredentials.
When the token expires (as given in Settings.py), browser knows when to remove it as backend automatically invalidates it after the time.
Final conclusions
One social account, one local user: This is the default behavior. When a user logs in with a social account, if no existing local user with the same email address exists, a new local user is automatically created and linked to the social account. Subsequent logins can be done either with the social account or with the local username and password.
Later if needed, you can also connect a local account (django user account) to a social accounts. For this you can use allauth /connect/<PROVIDER>/ endpoints. This is already there if you’ve added allauth.urls as says in wiki.
There are many things that we have not explored yet. Perhaps this is all you need to successfully implement OAuth in your django app using a provider of choice. I’ll keep this article updated. Sub to the RSS for future updates. That’s all! Write your comments via email. Have a pleasant week, all!